Desert Online General Trading LLC
Dubai, United Arab Emirates
Desert Online General Trading LLC
Dubai, United Arab Emirates


🔧 Elevate Your Craft with E-Z LOK Inserts!
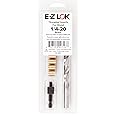
The E-Z LOK 400-4 Threaded Insert is a high-quality brass insert designed for woodworking applications, featuring a proprietary knife thread for enhanced holding power. With 1/4"-20 internal threads and a length of 0.500", this pack of 25 inserts is perfect for use in hardwoods like oak, cherry, and maple, ensuring durability and reliability in your projects.


J**Z
Quality product, methods to install
This review is for 1/4-20 brass inserts.First off, I got some really good tips from other reviewers and hats off to them! I will give a more detailed review to help other folks install these as it is tough to install in hardwoods straight. Here is my pictorial review based on a live edge bar project:Photo 1: As with any thread, there is a lead angle which allows the insert to sit at a slight angle when sitting in the hole.Photo 2: Using the E-Z LOK installation tool, I installed the insert but went in at a slight angle equal to the thread lead angle (Not good!). See the remaining photos for alternate installation methods.Photo 3: I cut the head off a 3" 1/4-20 bolt and threaded two nuts on the end and jammed together. In red oak, I first drilled 25/64 holes for the inserts in my drill press. This was the drill size listed with the inserts. I tried a slightly larger drill bit, 13/32", which allowed the insert to go in easier but the insert tended to pull out slightly when tightening down the 1/4" fastener. I would stick with the manufacturer's recommendation on the bag (Using the methods in this review, you will have no issues installing). I then chucked the tool I made in my drill press.Photos 4 and 5: For work you can fit in a vice, it is better to use a drill press if available (If not see photos 6, 7 and 8). While applying a downward force with the drill press handle, turn the upper nut using a 7/16" ratchet wrench. When the bottom nut is flush with the work, un-chuck the inert tool and remove it from the insert using the bottom nut. (Note: use soap or thread wax on the insert threads. It will go in much easier. Also go slow and never turn on the drill press to install !).Photo 6: The live edge bar top was too large to fit on the drill press. The top was from a large cherry branch. I used a drill guide to drill the holes. You can get a drill guide on Amazon for about 30 bucks. I would get one anyhow since you can use it for many other projects. They also have a nice depth stop to keep from drilling through the board.Photos 7 and 8: I installed the inserts in the bar top using the drill guide. I chucked the tool I made for the drill press into the guide chuck. I got a 3/8" chuck with a 1/4" hex shaft on Amazon to chuck to the guide top shaft. Then I used a 1/4 drive 1/4" socket with a 6" extension and T handle to fit onto the top chuck hex shaft. Then installed the insert while applying a downward force on the T handle. The tool can be removed by just turning back the T handle. The inserts went in perfectly straight using the drill press or drill guide! (They go in easy with the drill press but also go in without much difficulty using the drill guide).Photos 9 and 10: This is the finished bar project. The bar legs were made from 1" black pipe and fittings all attached to the top, foot rest and feet using the brass inserts.Installing the inserts with the E-Z LOK installation tool is difficult in hardwood, but I am still giving them a "5" since they are such a quality product. I made all the pieces in my garage then assembled easily in the basement due to the inserts and can be easily disassembled if necessary.The only thing I would change with the insert is to have a slightly longer unthreaded nose to help overcome the thread lead angle.FYI, in order to remove an insert, you have to use the E-Z LOK installation tool. A screw driver will just bugger up the slot (So even with the above installation methods without the tool, I would still purchase one to remove an insert if necessary).Oh, also use a scrap board to practice a couple of installations to get the hang of it.
D**R
They are strong
Works really great put some glue on them screw in the holes… good price I would purchase again
A**R
very nice quality
very nice quality
S**Y
Breaks easy, the right tools would make the difference.
The suggested drill bit size (17/64) is too small. The tips also break easy. My largest flat head screw driver was not big enough to give it enough tork. I went through several of them, good thing they come with so many. It would be wonderful if it came with a tool that let you insert and twist them in. But eventually I did get my project done.
R**R
thread inserts
easy to install, great price, fast delivery
J**E
Pilot hole drill sizes
Pilot hole dimensions, you're welcome.
O**Z
Easy to install if done correctly.
Solid product at a good price compared to big box home improvement stores assuming you can even find them locally.Installation is easy if you take your time and use the right tools/aids. Fortunately no expensive specialty tool is required to install the threaded insert besides a ratchet wrench and socket, once you drill the correct size hole.For installation of the 3/8 inch inserts in fairly hard beechwood, I used a 3 inch long 3/8” - 16 bolt, two 3/8 nuts, ratchet wrench and a 9/16” deep socket. I installed a full pack of 10 inserts and never had the installation bolt and nuts get stuck to the inserts or any other problems. Two nuts threaded on the bolt hand tight is the secret. The installation bolt and nuts pops loose easily every time.1. Drilled the hole for the insert.2. Thread both nuts hand tight as far as they’d go on the bolt.3. Threaded the insert on the bolt.4. Applied candle wax to the insert threads.5. Carefully threaded the insert into the hole with the ratchet wrench.6. Backed the bolt and nuts out of the insert.7. On to the next insert!
D**G
Finicky.
Can confirm that you need their kit to install this. Not a flexible system; doesn't work with standard shop tools or jury rigged solutions.
Trustpilot
3 weeks ago
5 days ago