
DOWNLOAD THE APP


Customer Services
Copyright © 2025 Desertcart Holdings Limited
DOWNLOAD THE APP
🔧 Elevate your 3D printing game with the ultimate CAN bus adapter — because your setup deserves the best!
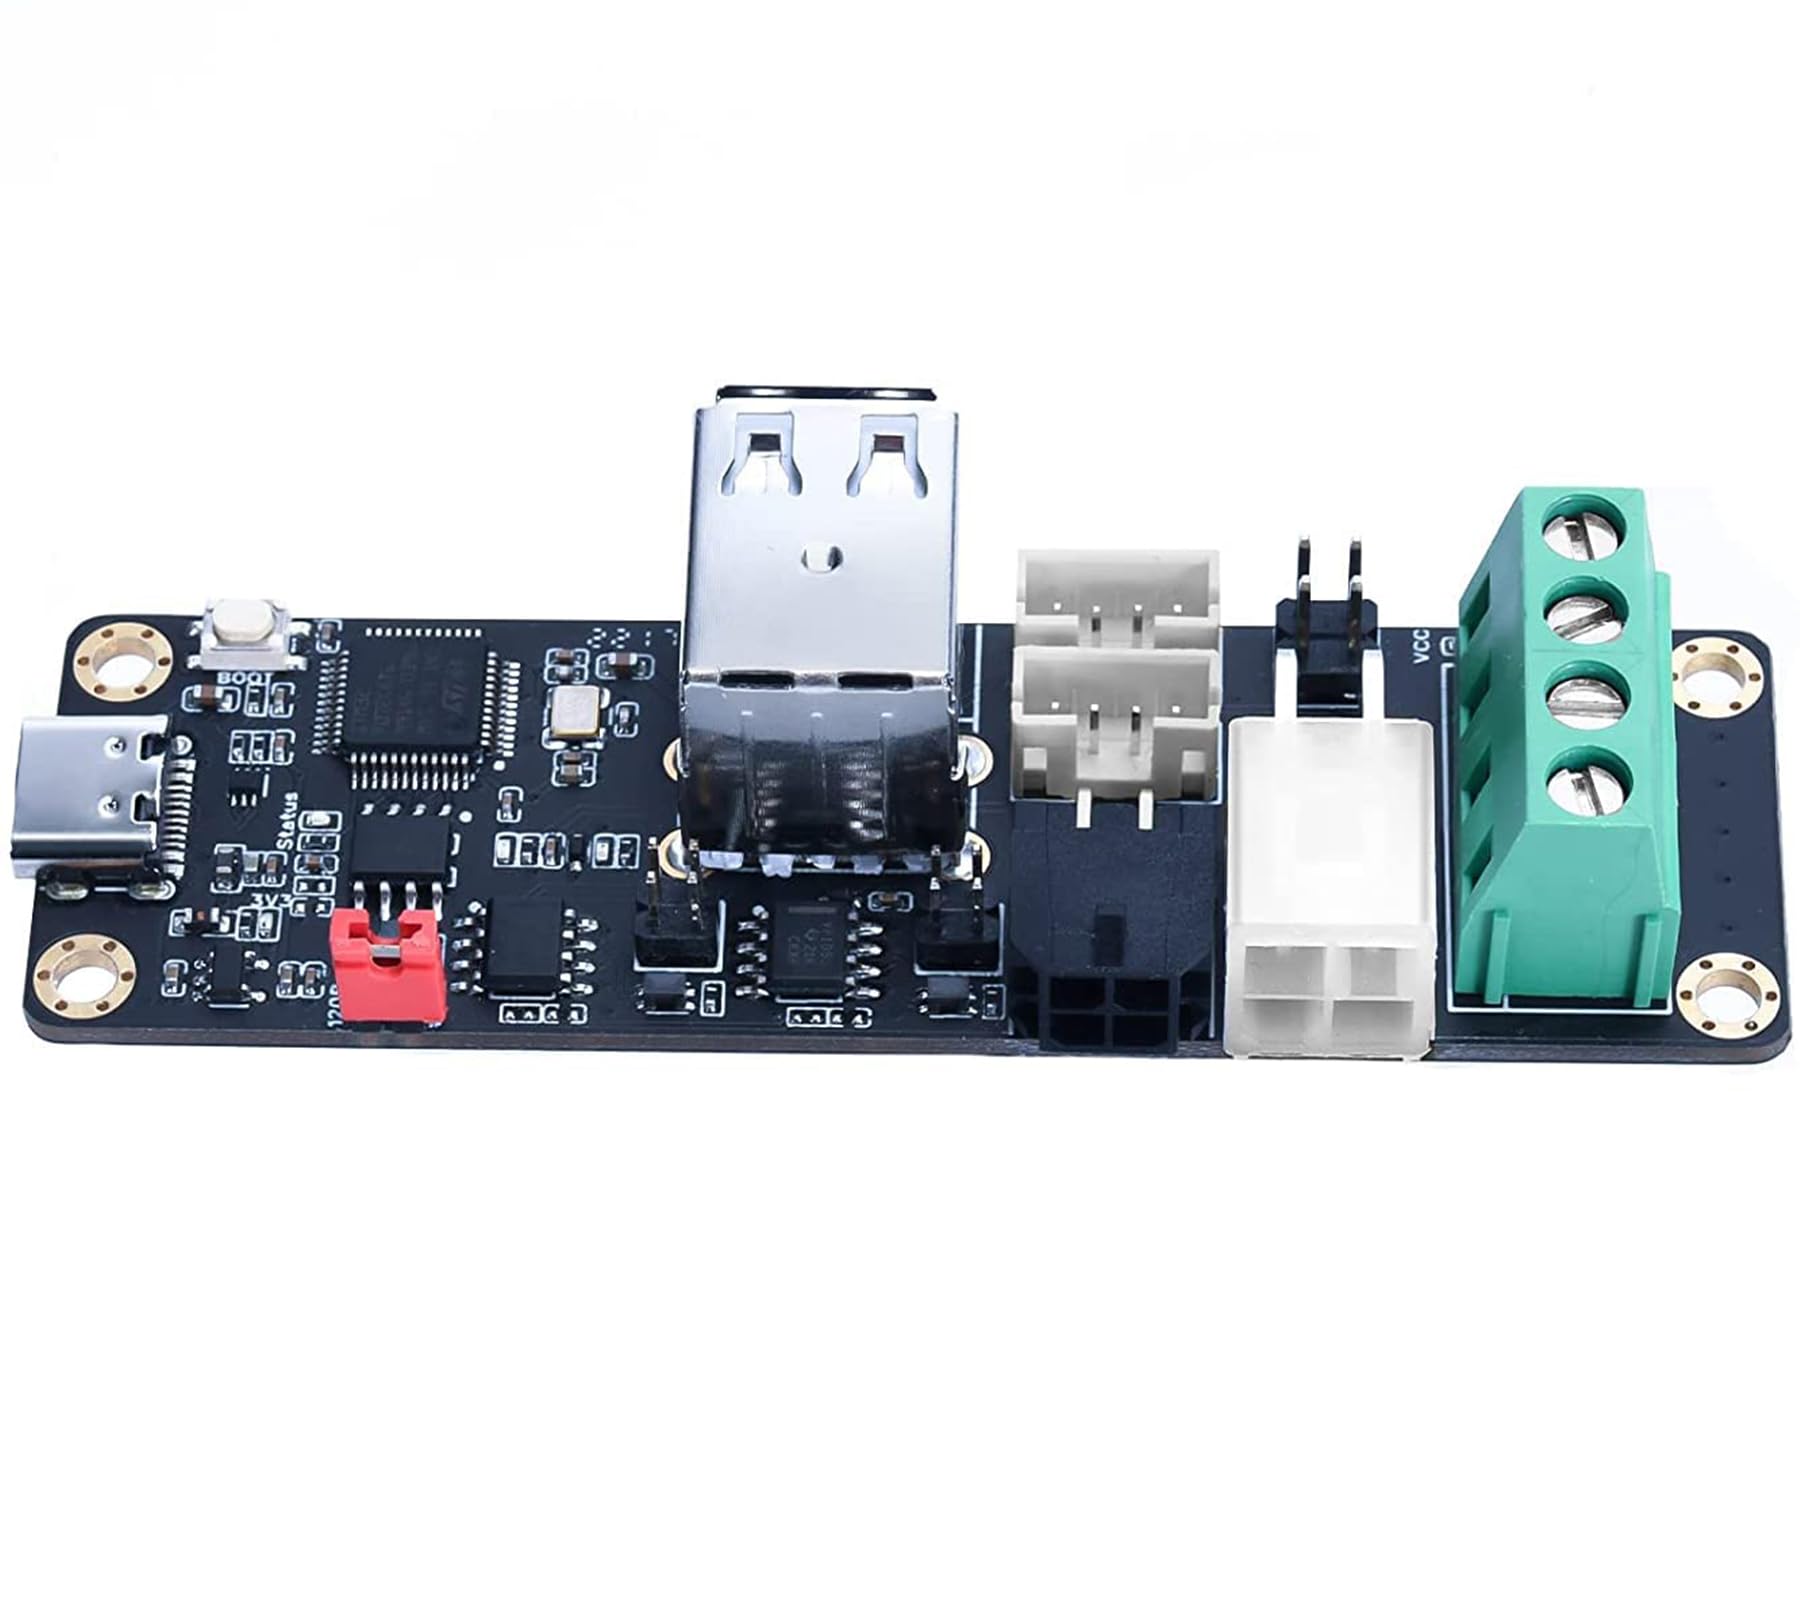
The BIGTREETECH U2C V2.1 Adapter Board is a high-performance CAN bus interface designed for Raspberry Pi 3D printer integrations. Featuring three CAN output ports, immersion gold PCB for superior soldering, and ESD-protected Type-C connectivity, it ensures reliable, noise-resistant data transmission and easy firmware updates. Ideal for advanced multi-node 3D printing environments seeking robust, real-time communication.


| ASIN | B0BVQQ82SP |
| Best Sellers Rank | #34,851 in Industrial & Scientific ( See Top 100 in Industrial & Scientific ) #675 in 3D Printer Accessories |
| Date First Available | March 8, 2023 |
| Item Weight | 1.76 ounces |
| Manufacturer | Octobigtree |
| Package Dimensions | 4.53 x 3.03 x 1.54 inches |
A**R
Get this one
Worked great, just follow the Esoterical can bus guide to flash it and get a proper crimper. The RP2040 version is much easier to crimp.
R**S
Works great till you let the smoke out. That was on me!!!!
I put this on my Voron 350mm I love the idea of looking at it at a glance to get the quick info. As far as its full functionality its more of a cute "option" for me. Look my tool head has a face. Looks cool in a dark room "My printer is watching you" Build is good just don't let the magic smoke out.
D**5
Reduces Wires but Adds Complexity
Though it sounds great to be able to swap out hotend types, sensor types without dismantling the bunch of cable tracks, it does take a great deal of configuring, and can be confusing if you don't understand how it all talks. Bigtreetech has a great manual which you should read first before tearing into this to know it will be an undertaking. Once you follow their great instructions it will be rewarding as it will be easy to manage upgrades in the future. It is a great kit, well documented, frustrating and fun
J**H
Reliable Connectivity Upgrade for Ender 5: A Solid 4-Star Performer
I recently installed the CAN Bus to USB board on my modified Ender 5, and I must say, it's been a game-changer for my 3D printing experience. The board allowed me to establish a seamless connection between my printer and computer, enabling smoother data transfer and control. One of the standout features of this product is its compatibility with my modified Ender 5 setup. The installation process was straightforward, and I encountered no compatibility issues. Within minutes, I had the board up and running, and I could immediately notice the difference in communication speed and stability. The board's build quality is impressive, providing a durable and robust connection that hasn't failed me since I started using it. Its compact design doesn't take up much space in my workspace, which is a big plus. Moreover, the CAN Bus to USB board has significantly improved my printing accuracy and reduced the chances of communication errors, leading to better print outcomes. The reliable connection ensures that I can pause and resume prints without any disruptions, which is a boon for larger and more complex projects. Although the board delivers on its promises, I feel there is room for some minor improvements. The documentation provided with the product could be more comprehensive, especially for those who are new to working with CAN Bus connections. Additionally, it would be helpful if the manufacturer offered better customer support to address any potential troubleshooting queries. In conclusion, the CAN Bus to USB board has certainly enhanced my 3D printing experience with the modified Ender 5. Its seamless connectivity, sturdy build, and improved printing accuracy make it a worthwhile upgrade for any 3D printing enthusiast. With a few minor enhancements to documentation and customer support, this product would undoubtedly earn a full 5-star rating. For now, I'm giving it a solid 4 stars and would recommend it to others looking to elevate their printing capabilities.
S**8
So far so good
I gave this a shot and I must say so far the easiest tool board I have ever setup. I didn't have any of the usual canbus woes and for that I'm sold. mcu flashing isn't any different than anything else I've done and after that, it's pretty much plug-and-play. In true BTT fashion, the instructions are incomplete and misleading. For example it is necessary to hit the boot&reset buttons for dfu mode to update the mcu, even though the guide says otherwise. For those of us using the galileo2, this does not even come close to fitting and the option on the btt github doesn't quite have enough clearance either. there are some options on printables that do work. Setting up everything in the .cfg is straightforward and didn't have any issues there.
I**H
Works for me
BTT has bad quality control and CAN transceivers are known to blow up even from well respected companies, so this isn't a great combination. But this is a cost effective solution and works most of the time. Thankfully, I didn't get a lemon with my U2C. It was extremely easy to use and setup. This is pretty much plug and play. You put it into boot mode, you update the firmware from github, and then you have a working CAN connection to your toolhead.
R**.
Did not work out of box, DOA
Did not work out of the box. Installed everything as the manual shows (there is a new manul version btw) and noticed there were no status LED's when powered. Confirmed I had power at both PCB's. There is a fuse on both PCB's as well and confirmed not blown. It looks nice and would really clean up the wiring but not worth the issues. Just use a normal PCB and hardwire it. Also note there is a bit of issue with stealthburners front cover and the main pcb that bolts to the toolhead side. There are several connectors on the front cover PCB that wont allow it to be 'shimmed' or moved closer to the extruder body. The issue is the header that connects the two PCB's doesn't full engage one another using Galileo2 extruder.
A**N
Setup can be daunting but follow online instructions and take your time. Works great!
Bit of a pain to setup and re-crimp with the included pins and connectors but I get it, there is limited room inside that toolhead (stealthburner). as far as functionality goes, this board works fantastic and have not had any issues. Went through the Esoterical CANbus guide to setup a direct CAN host to my BTT Octopus - https://canbus.esoterical.online/ and it worked great just follow the directions very closely. Make sure to cut and crimp your toolhead fan and LED wires to exactly the size needed as there in no room in there for extra wires. Great Job BTT, nice board.
Trustpilot
3 weeks ago
1 week ago