


Buy anything from 5,000+ international stores. One checkout price. No surprise fees. Join 2M+ shoppers on Desertcart.
Desertcart purchases this item on your behalf and handles shipping, customs, and support to Italy.
🛞 Elevate your Tesla’s style in 5 minutes—because your wheels deserve the spotlight!
These gloss red overlay decals are custom-designed for the 2026+ Tesla Model Y Refresh (Juniper) 19" Crossflow and 20" Helix 2.0 wheels. Made from premium automotive vinyl with a 5-10 year warranty, they install easily in under 5 minutes using pre-applied transfer tape. Manufactured in the USA with commercial-grade precision, the set includes 5 decals, installation wipes, and a 90-day free replacement warranty, offering a quick, stylish upgrade that maintains the OEM look while adding a bold splash of color.
| ASIN | B0FF2GPXDB |
| Best Sellers Rank | #43,304 in Automotive ( See Top 100 in Automotive ) #550 in Automotive Decals |
| Brand Name | Custom Cut Graphics |
| Color | Gloss Red |
| Customer Reviews | 4.5 4.5 out of 5 stars (204) |
| Exterior Finish | Red Plastic |
| Installation Type | Self-Adhesive |
| Manufacturer | Custom Cut Graphics |
| Manufacturer Part Number | MY-ref-Gloss Red |
| Material Type | Vinyl |
| Size | Refresh (Juniper) Model Y (19-in & 20-in) |
| UPC | 810148822408 |
| Unit Count | 1.0 Count |
W**Z
Perfect Tesla decals for the rims!
These stickers might seem unnecessary but it is a cheap way to liven up the rims that come with the Model 3 Performance. You don't think you need them but once they're on they look great and you wonder why you went so long without them. Super easy to install and have no semblance of peeling off. Fits perfectly and I think they will last a long time.
J**Y
Looks stunning
I love the color that it perfectly match with the Tesla red. The quality is super nice it looks like the original logo coming from Tesla. It fits perfectly with the Tesla logo in the hub cover. The application's is kind of challenging at my first application because it doesn’t easily separate from the plastic during the application. You just have to be extra careful during the application making sure to fit it well on the logo. The company really stand with their product. If you messed up more than 2x just let them know and they can work out a replacement with you. Thank you.
D**D
Looks great, difficult to position but worth it
Looks great. Watched the video and I have put other decals on before and this was by far the hardest due to the hub cover T being so recessed. The thick cover plastic is very stiff and nonbendable so it doesn't push into the recessed logo well to allow the decal to transfer and stick to the hub cap. I had to pull them off the backing and place them with a pair of tweezers and stick down with a match stick, q tip, and finally a toothpick. I hope they stay in place as I frequently go through automatic car washes. I had these on my older Tesla hubs in the past and they are still on it. I tried to paint onto other extra hubs that I had by flooding the indentations with enamel model paint with a syringe, Worked well as the indents are deep. A lot more labor intensive but look good too. I'll wait to see if I need them.
O**A
Just like model airplane decals.
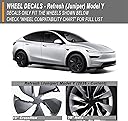
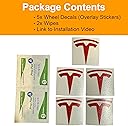
If you have fat fingers and have issues putting on model airplane decals, this will be a little difficult for you. I had to use one of the extra logos sent in the package because I messed one up. Thank you for sending five instead of four If I had to do this again, I would’ve taken the caps off and then applied the logo instead of laying on the ground applying the logo in every different direction. You cannot tell my mistake m, very slight on one, wheel. Other than that the logos went on easily in my estimation. Take your time this is not a race. It’s your car. Be proud of your Tesla, especially for the price we pay for these things. I used cotton Q-tips, saturated in denatured alcohol, to ensure I removed all the grime off the cap. I used another Q-tip without any alcohol on the Q-Tip to push the logo into its resting position and then I removed the logo backing. I love the results. I would recommend buying the package with the larger logos for the Frunk, steering wheel, and the Boot as well as the five logos for the wheels if you have my set up. Save you some money White Model Y with a pop of red on silver wheel, Simply Sexy.
B**N
Look Great but tricky to apply.
Look nice once applied, however, applying is a pain. They are applied to a piece of film that when placed over the depressions of the Tesla Logo and pushed down into the groove the sheet of film bunches up and pulls the red logo all over. So, I applied the top bar first and held in place with a screwdriver and peeled away the film starting at a corner of the bar with the rest of the red logo still on the film. Then applied pressure along the bar to stick down in place. Then I placed the top wings of the logo over the depressions and pushed the wings down while the long bottom strip popped up into the air. Then I pried the wing on one side off the film and gently pulled the film away from the remaining red logo while holding the red wing down firmly with the screwdriver, and then once free I steered the rest of the red logo into place. Once applied then I pressed along the red logo until firmly stuck down. Whew!! The supplied instructions were junk. 2026 Model Y Juniper.
T**J
Exactly as pictured.
Had my car detailed in november and they are still affixed. Its march. Nice detail, fits perfectly. looks exactly as pictured.
R**T
Take your time it’s not a race. It only took about 25 minutes
The product does have an insulation video if you want scan it but I’d don’t have time to waste. So here is step by step instructions: 1. Remove wheels cap and clean the center cap Tesla logo with the alcohol pad provided. 2. Peel the clear transfer tape from backing paper. 3. Center the decal over the T (hint center the bottom T decal first the top well aligned. 4. press the transfer tape lightly to the center cap to prevent movement of your alignment (reposition if needed) 5 Rub the bottom decal with a Q tips (optional) I like using it due to softer less aggressive to the decal or just use a plastic removal tools. 6. Remove the transfer tape slowly, then continue to lightly rub the decals for final corrections and better adherence to the center cap. 7. Reinstall the wheel caps. Photos are provided. Enjoy the fruits of your labor. Love the quality and results it’s worth the price.
G**E
Perfect fit
Exactly fits my Tesla wheels logo indentation. Matches the red brake calipers on my M3P.
Trustpilot
1 month ago
1 month ago