We remain fully operational. Our teams are working around the clock to ensure your deliveries continue safely.

DOWNLOAD THE APP


Customer Services
Copyright © 2025 Desertcart Holdings Limited
DOWNLOAD THE APP


🚀 Drive the future of smart robotics today!
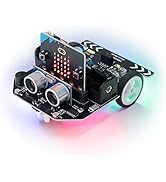
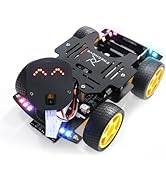
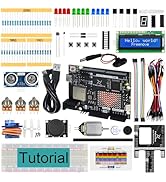
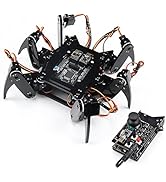
The Freenove 4WD Smart Car Kit is a versatile, programmable robotic vehicle compatible with multiple Raspberry Pi models (not included). Featuring 4-wheel drive, a rotatable camera with face tracking, ultrasonic sensors for obstacle avoidance, and wireless app control, it offers an immersive hands-on experience in robotics and coding. Perfect for tech-savvy millennials eager to build, customize, and control their own smart car, backed by detailed tutorials and responsive customer support.


| ASIN | B07YD2LT9D |
| Amazon Bestseller | #32,412 in Computers ( See Top 100 in Computers ) #35 in Single-Board Computer Kits |
| Brand | FREENOVE |
| CPU Model | 5X86 |
| Compatible Devices | Smartphone, PC, Camera |
| Country of Origin | China |
| Customer Reviews | 4.2 4.2 out of 5 stars (626) |
| External Testing Certification | Não aplicável |
| Item Dimensions L x W x H | 21L x 15W x 12.5H cm |
| Manufacturer | Freenove |
| Memory Storage Capacity | 4 MB |
| Mfr Part Number | FNK0043 |
| Model Number | FNK0043 |
| Operating System | Linux |
| Processor Brand | ARM |
| Processor Count | 1 |
| RAM Memory Technology | LPDDR5 |
| Total Usb Ports | 1 |
| Wireless Compability | Radio Frequency |
M**U
マニュアル(PDF)や組み立て動画があるので、初心者でも簡単に作れると思います。 組み立てた後、動作せず、私の手順が違うのかとサポートの方とメールでやり取りしました。 まず驚いたのが、1日以内で返信をくれるという返信の速さ。 メールの内容も丁寧で分かりやすかったです。 何度かやり取りした結果、新しい基盤を送ってくださり、無事に動くようになりました。 トラブルが起きたとしてもメーカーのサポートが充実しているので、安心して購入できる品だと思います!
K**ー
supportメールは、英語ですが対応は親切です。 基盤に不具合があり、電源が最初は入ったのですが、そのうち入らなくなりました。 メールでのサポートは、きちんとしてくれます。 最終的には、新しい基盤を送ってくれました。
レ**ダ
マニュアルや組み立て動画は分かりやすく作られいます。メールの問い合わせも丁寧に対応してくれました。
い**き
プログラミングできる Raspberry Pi ベースのロボットキットが欲しくて購入しました。 本商品の他に、Raspberry Pi CPUボード(私は 3B)とリチウムイオン電池 18650 x 2本を購入する必要がありますが、それを入れてもペイする機能の商品だと思います。 英語ですが、詳しい解説書が用意されており、また、テクニカルサポートも丁寧な対応ですので、困ることはありません。 サンプルプログラムだけでも楽しめますが、自分でもプログラミングできるようになりたいです。 動画は超音波センサーで障害物を避けて自動走行しているところです。
A**R
多くのセンサーを積んでおり、最初からライントレースなど多くのプログラムが用意されており、 組み立てたら完成のような製品です。 Freenoveの中でも現状で最も力を入れている製品で、マニュアル動画が充実しています。(英語ですが・・) pdfのチュートリアルもありますが、こちらは少し誤りがあります。 不満な点は、頭を激しく動かすとカメラのフラットケーブルが外れやすいところかな~
K**E
製作する者のスキルが現状では必要です。しかし価格を考えると最高の製品です。 後方左車輪を止めるためのナットが基板にあたり、削れ、5VとGNDが短絡しました。注意が必要です。 ナットの位置のDCモーターの+5V側の線になります。次回、引き回しで回避願います。私は絶縁シートを入れました。ほかの方の書き込みにもありましたが、駆動DCモーターの極性がプログラムと逆でピンを赤黒入れ替えました。
天**人
設定方法に1、マニュアル(PDF)と2,動画(you tube)があるのですが、両方を重ねながら組み立てとラズベリーパイの設定を進めるのですが途中から両者が違ってくるのです。サポートに問い合わせをするとマニュアルを優先してくださいという返答でした。でも、マニュアルも他の機種のプログラムをインストールするように指示があったりするので、サポートに問うとマニュアルが間違っている気にするなという返答です。何とか悪戦苦闘して設定と組み立てが終了。でも、まったく動きません。サポートに問い合わせると電池ホルダーに不具合が多く電池を指で押さえれば動くという返事でした。しかし、いくら指で押さえてもびくともしません。この商品は初心者では無理です。商品自体もはずれです。
A**Y
freenove4wdcar for raspberrypiを2年前に購入しました。そして現在は当時より「raspberripi pi」の [os]が進化してカメラのプログラムが大幅に変化して、当時のカメラが使用できなくなりました。 それで、「freenoveのサポート」に「picamera2」でのプログラムの開発をお願いしたところ、気持ちよく引き受けていただいて、2日後にはupdateの連絡があり「github」よりインストールして快適にビデオストリームを見ることができました。 freenoveの素早い対応の感激しています。
P**I
It is a very cool robot; my daughter managed to assemble it by herself. Configuring Raspberry is easy, but some "hacking" skills can't hurt! ;) The only problem was with moving in the wrong direction. I changed a few lines of code, changes can be found in my repository https://www.amazon.de/review/create-review/?ie=UTF8&channel=glance-detail&asin=B07YD2LT9D
A**E
It says so in the description, but do note, you need a Raspberry Pi (I used a Pi 3) and two 18650 batteries, which are not included. I was very keen to build this and try it out, so I downloaded the code and set up my Raspberry Pi, shortly after placing my order. Fortunately, I already had a couple of 18650 batteries. So, when the kit arrived the next day, I was good to go. Assembly took about 2 hours. First point to note is that I have big fingers and some of the screws are really tiny – I needed fine tweezers for these. Second point, when assembling the pan and tilt ‘head’, the instructions tell you to plug in the servos and run servo.py to put them in the correct position before assembly. I would recommend carrying out steps 1 to 9 of the 11 illustrated steps (page 51 at time of writing) before connecting the servos. I would also suggest connecting the cables to the camera and ultrasonic units before connecting the ‘face’ to the ‘neck’ as they are lot more accessible at this point. Excepting a couple of fiddly bits, the kit was straight forward to assemble, I ran all the test modules and everything worked first time, except it went backwards instead of forwards – but the instructions covered correcting this. It does everything shown in the Freenove video and can also be controlled directly by a phone app (android in my case). I was impressed by the quality of the build and also that all the code is open source. At the price, having a kit you can control from your phone, pretty much out of the box, is already good value, but the potential for writing your own code is even more appealing and I would imagine would be a great incentive for novice coders. I hope a community will develop where people can share their code and ideas. I also think the kit is ideal for further development – a robot arm would be a cool addition, perhaps Freenove may develop expansion kits in the future. In summary, a great kit, a great learning tool and best of all – open source!
C**.
Essendo sempre stato appassionato di informatica e programmazione, ho voluto anche avvicinarmi anche all'elettronica. Per farlo ho comprato un Raspeberry ed un kit, sempre di Freenove, ed a quel punto ho scoperto un mondo appassionante fatto si di elettronica, ma anche di sistemi operativi (Debian) e programmazione (Python). Ho quindi comprato questo kit e l'ho assemblato abbastanza facilmente pur non avendo una grande abilità manuale, darei solo il consiglio di aggiungerci anche minuteria di riserva, perdere qualche vitina è facile. Finito il montaggio sono passato alla parte programmazione che è assolutamente ben guidata e spiegata, ed è veramente interessante e se ci sono dubbi il servizio di supporto risponde molto velocemente e risolve il problema. Concludendo, ora funziona tutto perfettamente, ma sto rivedendo i programmi per ampliare e migliorare le funzioni. Non vi dico che lo ricomprerei, vi dico che a brevissimo comprerò il kit del cane.
S**B
This is a great kit with everything you need to build a car. All parts were shipped as expected and the code files are easy to download. The code works too. The chassis has 8 connector pins for servo motors, and you are only using 2 for this project. This means you can additionally use the rest of the slots. It's a great starting kit for kids and adults looking to get into robotics. There are few things I wish would be better with this kit: - the screw driver in the kit is low quality, so I had to use one of my own. - instrumentation for the front camera and sensor motor should be more robust. This could be due to cheap plastic threading on the servo shaft. The inverted motor falls off almost instantly when started, so I wasn't able to test the follow object routine. - The batteries (18650) are expensive at least in Canada, so it took a while to start the car. If there was a way to use the motors with regular rechargeable power supply, it would have been great.
M**L
Hace tiempo que quería compartir con otros usuarios de Amazon mi opinión sobre el pequeño coche FREENOVE 4W SMART CAR KIT, lo he comparado con el modelo Picar X de SunFounder y Picar B Mars Rover de Adeep. En general es este un producto que me gusta mucho veamos puntos a favor y en contra: Puntos a favor: 1 - Es considerablemente más económico y tiene las mismas funcionalidades, es cierto que el modelo Picar B de Adeep incluye baterías y micrófono USB, pero por la diferencia de precio puedes comprar ambas cosas. 2 - Es considerablemente más fácil y rápido de montar. Incorpora una pieza central que ya lleva unido el porta-baterías y el circuito entre la Raspberry y los motores y servo motores se encuentran integrados en el chasis, para mí esto es una genialidad, no solo es más ecónimo, sino que simplifica el proceso de montaje, lo que para personas que piensan en comprar varios de ellos es muy importante. 3 - Solo tiene 2 servo motores y tiene 4 motores que le proporcionan tracción a las 4 ruedas de modo que no tiene ruedas delanteras que giren. Esto puede parecer un inconveniente, pero yo lo veo como una ventaja. El coche puede hacer girar sus ruedas izquierdas hacia adelante y sus ruedas derechas hacia atrás y viceversa a toda velocidad, lo que permite un giro sobre si mismo muy divertido. Además, al no tener ruedas que giren a los lados, esto implica que no tiene todas las piezas necesarias para que un servomotor mueva las ruedas, lo que de nuevo simplifica enormemente el proceso de montaje lo cual es de agradecer. 4 - Tiene dos interruptores, uno general y otro para todo lo que no es propiamente la Raspberry como su circuito y los servomotores, lo cual es de agradecer, porque tener un interruptor general es normal, pero un segundo interruptor permite ahorrar batería cuando estás realizando labores de configuración de la Raspberry que no implican a los motores o servomotores. 5 - Cuenta con un medidor de batería con 4 leds, cuando están encendidas las 4 las baterías están a tope de carga, cuando solo hay 3 hay menos carga, pero aun funciona bien, el correo de soporte me ha aconsejado que las cambie cuando llega a dos luces. Esto es especialmente importante cuando está haciendo pruebas porque hay estadios intermedios entre funcionar y no funcionar bien por culpa de falta de energía, y si estás programando en Python deseas antes que nada eliminar posibles variable. 6 - Te proporcionan una clase motor otra clase servo y una más para el sensor de ultrasonidos razonablemente usables, aunque se pueden mejorar. Otros coches como Picar-B Mars Rover de Adeep te dan un software muy difícil de reutilizar. 7 - Tienen un total de 8 salidas para conectar servomotores, lo cual es especialmente útil si como a mí se te rompe una, hay que decir al respecto que, si bien la competencia no tenía 8 salidas, tampoco se me rompió ninguna de ellas. 8 - Usa tornillos relativamente grandes, si nos fijamos en la “cabeza” en el modelo Picar B de Adeep, los tornillos de la cabeza eran verdadero infierno, además, tuve que romper una parte del metacrilato para hacer que encajaran. En un orden tanto de facilidad de montaje como de uso del software Python el mejor es FREENOVE 4W SMART CAR KIT, en segundo lugar, Picar X de SunFounder y en tercer lugar Picar-B Mars Rover de Adeep, sin duda el más complicado. Puntos en contra: 1 - Se me ha roto una de las salidas para servomotores, pero me han dado una solución con la cual no he necesitado desmontar el cochecito. Dos puntualizaciones: Por algún motivo que desconozco la salida cero para servomotor tenía en la clase servo un tratamiento diferente al resto, yo estoy usando las salidas 2 y 3 por igual y tuve que cambiar los movimientos hacia la izquierda por los de la derecha y viceversa, en cualquier caso, en última instancia uso la siguiente clase para usar las salidas 2 y 3: from PCA9685 import PCA9685 class Servo: def __init__(self): self.PwmServo = PCA9685(0x40, debug=True) self.PwmServo.setPWMFreq(50) self.PwmServo.setServoPulse(10, 1500) self.PwmServo.setServoPulse(11, 1500) def setServoPwm(self, channel, angle, error=10): angle = int(angle) if channel == '0': self.PwmServo.setServoPulse(10, 500 + int((angle + error) / 0.09)) elif channel == '1': self.PwmServo.setServoPulse(11, 500 + int((angle + error) / 0.09))# En segundo lugar, he realizado algunos cambios en la clase para medir la distancia a un objeto por parte del sensor por ultrasonidos, ya que tal y como estaba muchas veces me empezaba dando el valor cero reiteradamente. Empecé por buscar en el array de salida en vez la posición centra cualquier posición empezando por el centro que fuera distinta de cero, finalmente hago una media de los valores distintos de cero, lo que disminuye el efecto de posibles errores puntuales. Pose la clase en un fichero aparte para poder reutilizar en diversos proyectos, y tengo un pequeño programa para probar la clase. Ultrasonic.py: import time import asyncio import RPi.GPIO as GPIO class Ultrasonic: def __init__(self): GPIO.setwarnings(False) self.trigger_pin = 27 self.echo_pin = 22 self.MAX_DISTANCE = 300 # define the maximum measuring distance, unit: cm self.timeOut = self.MAX_DISTANCE * 60 # calculate timeout according to the maximum measuring distance GPIO.setmode(GPIO.BCM) GPIO.setup(self.trigger_pin, GPIO.OUT) GPIO.setup(self.echo_pin, GPIO.IN) def pulseIn(self, pin, level, timeOut): t0 = time.time() while (GPIO.input(pin) != level): if ((time.time() - t0) > timeOut * 0.000001): return 0 t0 = time.time() while (GPIO.input(pin) == level): if ((time.time() - t0) > timeOut * 0.000001): return 0 pulseTime = (time.time() - t0) * 1000000 return pulseTime async def get_distance(self): distance_cm = [0, 0, 0, 0, 0] for i in range(5): GPIO.output(self.trigger_pin, GPIO.HIGH) await asyncio.sleep(0.00001) GPIO.output(self.trigger_pin, GPIO.LOW) pingTime = self.pulseIn(self.echo_pin, GPIO.HIGH, self.timeOut) distance_cm[i] = pingTime * 340.0 / 2.0 / 10000.0 # Filter out zero values non_zero_distances = [d for d in distance_cm if d != 0] if not non_zero_distances: return 0 else: # Calcular la media manualmente sin usar statistics return int(sum(non_zero_distances) / len(non_zero_distances)) prueba_Ultrasonic.py: import asyncio from Ultrasonic import Ultrasonic # Crear instancia de Ultrasonic ultrasonic_sensor = Ultrasonic() async def main(): while True: distance = await ultrasonic_sensor.get_distance() print(f"La distancia es: {distance} cm") await asyncio.sleep(1) # Espera un segundo antes de la próxima medición # Ejecutar la función main dentro del event loop de asyncio asyncio.run(main())
Trustpilot
2 days ago
1 month ago