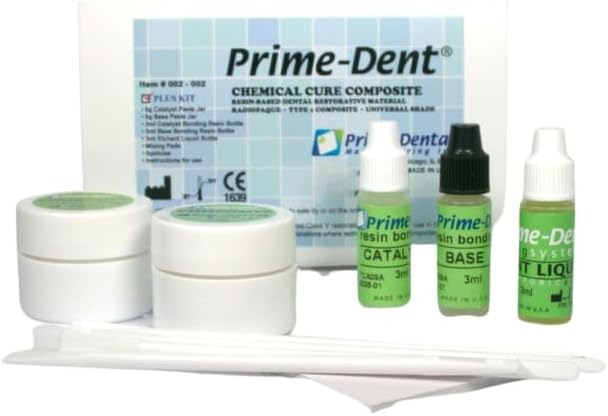


Oral Care – Self Curing Adhesive – 5 gr x 5 gr Kit – Mixing Pads & Spatulas Included
Product ID: 602723519
Details
- BrandHouse Brand
- ColorClear or
- Item FormPaste
- Item Package Quantity1
- Package InformationBottle
Buy anything from 5,000+ international stores. One checkout price. No surprise fees. Join 2M+ shoppers on Desertcart.
Desertcart purchases this item on your behalf and handles shipping, customs, and support to Italy.
Chipped Tooth Kit - Oral Care – Self Curing Adhesive – 5 gr x 5 gr Kit – Mixing Pads & Spatulas Included Review: Works well if you do it right. - Great product... So the directions are a little confusing but if you understand resin you would know... That being said here's how I got it to work well. I cleaned the tooth very well before even applying the etch. Then I dried it and I found dental micro brushes work really well for applying the etch and bonding agents. You just dip the brush into the container and squeeze lightly till you get a little on there. I also shaved some of the micro brushes "brushes part off to not collect to much on the brush.. this allows for more of an even application. It will hurt when you apply the etch and bonding agents if your tooth is prepared correctly.. if your not using something like Lidocaine Viscous... Ask your doc So using 3 different micro brushes (they're sold in 50-100 packs) $3.39=< Etch, rinse with a small needle tipped bottle of water.. dry.. then base bonding and then catalyst bonding... If you don't get a slightly sticky reaction once the base and catalyst are mixed you haven't done it evenly and might want to add more of one or the other.. thats why 3 different brushes it nice to have. After this, I found when using small amounts pea size or less that using the mixing pad just to mix the two pastes together hardens really fast.. so I'll use the pad just to get the pastes out of the containers then mix the paste on my prepared tooth... This allows I think a better mix since it's really able to get into the tooth and you get practice shaping it on the tooth before it hardens and can easily make it look smooth and quality. I used a dental floss pick shaved down with a razor to a fine point so to have and easier time of mixing and applying since I found the white mixing tools in the set too clunky and hard for delicate work. Then I used a diamond bit or a diamond/carbide needle file to shape and something to polish it up after. You can use dental sanding strips if you want... Well I have had it on for two days and my mouth feels Way Better so thank you!! I left pics of the micro brushes pack, shaved down part for better application on small areas and the dental pick.. there's already lots of pics of how "small" the kit is... In reality I've read that doing a mouth of veneers takes less than a 2.5g of resin so this being 10gm should be enough to last most of your life unless you have huge cavities or can't quite get the teeth clean and dry before application.. best of luck! Review: Holds On Tight!! - If you follow the directions and practice a couple times you can make a pretty realistic tooth repair with this stuff. People in reviews have complained about the small amount, but it's more than enough for about 20 midsize chip repairs. One thing I found from trial and error was that using a 60/40 Catalyst/Base ratio mix seems to work best. On my third attempt I was able to fix a badly broken and deadened (dark) front tooth that used to make me look remedial. Up close, it's a little grainy, but from 2+ feet away it looks totally natural and real. I smile with confidence now, for the first time in over 20 years. Couple of tips: Work fast. You get one good shot at forming the tooth, and just a few seconds to fine tune it, so prepare to make a couple practice runs. You may want to do two practice runs with a 40/60 Catalyst/Base mix because it will be softer and easier to remove. Then do the 3rd attempt with 60/40. Keep a flosser/pick handy to "reinstall" the gaps between teeth, but move inward toward your mouth as you remove the flosser tom avoid peeling back the chip repair. Interestingly, you can apply a layer over an existing cured attempt if there are pits or something.
| ASIN | B0CNKZ2QPT |
| Best Sellers Rank | #59,825 in Health & Household ( See Top 100 in Health & Household ) #28 in Emergency Dental Care Products |
| Brand | House Brand |
| Brand Name | House Brand |
| Color | Clear or Transparent |
| Compatible Material | Acrylic, Porcelain, Metal |
| Container Type | Bottle |
| Customer Reviews | 4.2 out of 5 stars 294 Reviews |
| Full Cure Time | 1 Hours |
| Item Form | Paste |
| Item Package Quantity | 1 |
| Manufacturer | House Brand |
| Material | Acrylic-based materials, polymers, and other chemical compounds |
| Material Type | Acrylic-based materials, polymers, and other chemical compounds |
| Model | 643781342077 |
| Number of Pieces | 2 |
| Other Special Features of the Product | Self-curing |
| Part Number | 442-2022 |
| Special Feature | Self-curing |
| Specific Uses For Product | Denture |
| UPC | 643781342077 |
| Unit Count | 1.0 Count |
| Viscosity Level | Medium to High |
| Water Resistance Level | Water Resistant |
R**Y
Works well if you do it right.
Great product... So the directions are a little confusing but if you understand resin you would know... That being said here's how I got it to work well. I cleaned the tooth very well before even applying the etch. Then I dried it and I found dental micro brushes work really well for applying the etch and bonding agents. You just dip the brush into the container and squeeze lightly till you get a little on there. I also shaved some of the micro brushes "brushes part off to not collect to much on the brush.. this allows for more of an even application. It will hurt when you apply the etch and bonding agents if your tooth is prepared correctly.. if your not using something like Lidocaine Viscous... Ask your doc So using 3 different micro brushes (they're sold in 50-100 packs) $3.39=< Etch, rinse with a small needle tipped bottle of water.. dry.. then base bonding and then catalyst bonding... If you don't get a slightly sticky reaction once the base and catalyst are mixed you haven't done it evenly and might want to add more of one or the other.. thats why 3 different brushes it nice to have. After this, I found when using small amounts pea size or less that using the mixing pad just to mix the two pastes together hardens really fast.. so I'll use the pad just to get the pastes out of the containers then mix the paste on my prepared tooth... This allows I think a better mix since it's really able to get into the tooth and you get practice shaping it on the tooth before it hardens and can easily make it look smooth and quality. I used a dental floss pick shaved down with a razor to a fine point so to have and easier time of mixing and applying since I found the white mixing tools in the set too clunky and hard for delicate work. Then I used a diamond bit or a diamond/carbide needle file to shape and something to polish it up after. You can use dental sanding strips if you want... Well I have had it on for two days and my mouth feels Way Better so thank you!! I left pics of the micro brushes pack, shaved down part for better application on small areas and the dental pick.. there's already lots of pics of how "small" the kit is... In reality I've read that doing a mouth of veneers takes less than a 2.5g of resin so this being 10gm should be enough to last most of your life unless you have huge cavities or can't quite get the teeth clean and dry before application.. best of luck!
J**N
Holds On Tight!!
If you follow the directions and practice a couple times you can make a pretty realistic tooth repair with this stuff. People in reviews have complained about the small amount, but it's more than enough for about 20 midsize chip repairs. One thing I found from trial and error was that using a 60/40 Catalyst/Base ratio mix seems to work best. On my third attempt I was able to fix a badly broken and deadened (dark) front tooth that used to make me look remedial. Up close, it's a little grainy, but from 2+ feet away it looks totally natural and real. I smile with confidence now, for the first time in over 20 years. Couple of tips: Work fast. You get one good shot at forming the tooth, and just a few seconds to fine tune it, so prepare to make a couple practice runs. You may want to do two practice runs with a 40/60 Catalyst/Base mix because it will be softer and easier to remove. Then do the 3rd attempt with 60/40. Keep a flosser/pick handy to "reinstall" the gaps between teeth, but move inward toward your mouth as you remove the flosser tom avoid peeling back the chip repair. Interestingly, you can apply a layer over an existing cured attempt if there are pits or something.
D**S
Great Product. Exactly what I was looking for.
This product is outstanding and professional, if used correctly. I had a gold crown that kept falling off after multiple dentist visits. They were using UV cure adhesive which they assured me was the proper way. 3 visits in 2 weeks, I then decided to do it myself. It has now been 3 months with this product. This can also be used for chip and cavity repair as long as no novacaine is required for drilling. The cured product looks exactly like tooth material. As a chemist myself, I will say the product takes a bit of focus and meticulousness to use properly and acheive desired results.
L**R
Strong, but filler particles are large/rough
Used this to repair chips on existing composite bonding my dentist put in (I have canine extensions - the tooth on the right side of the photo is the one I repaired; it broke off at roughly 2/3 way down, and you can barely tell I repaired it at all). So far it seems sturdy: I grind at night so if the repair is not strong (previously I was using a resin-based luting cement cut the job), it doesn't usually survive a single night. My only complaint is that the silica filler particles are on the large side - probably because this kit is meant to be strong enough for posterior repairs - unfortunately this makes it very hard to polish. The dental polishing kit I have simply couldn't do it, at I covered the surface with a thin layer of resin-based cement that has finer filler particles and are better for polishing. The overall result was good.
P**L
High hopes, Huge disapointment.
Was really excited to try this product. I received a unopened package of this, but the jar lids of the compounds were extremely lose with no seals, the product was very dry and was not effective. The instruction or shall I say lack there of were terrible. Swear they had to be wrote in China but since the product is made in the USA, prob not. Must be one of the 3 worst instructions I have came across. Non returnable item, but Amazon did credit it for me.
M**G
So far so good.
So far so good. I wouldnt skimp on the catalyst. I put a little bit more but mixed it in my hand . Then use a dental pick to put it on spots. If I use the fat end stirrer it does not aim it wear you want it ok. I had taken a bit of my saliva to lube my finger when to move it depending on your work. Maybe catalyst would have been better? I used a hair dryer on very low heat . Not close to the face. So far looks good. I will upload pictures. It may take you 3 times. But once you do it you will get the hang of it ok. I'm 66 and I did it.
C**R
Works, better than the plastic.
So far this is the best product that I have found, but it's not perfect, and it takes getting used to, this particular version of the product is very small, I kind of thought it by the picture, but did not realize till I got it just how little you get, If you're not an expert, you may have to do it more than once and then you'll run out quicker, I'm glad it's on Amazon, and it's $10 less than eBay, but eBay sends you a little bit more, or at least the containers are larger and seems like more even though its still a very shallow layer, but it's $10 more.
S**M
Really good for an emergency
Okay, not the best but it will work when you are in a jam. The thing is you have to mix the products and apply it to the tooth very quickly before it hardens. I will say that if you apply the product correctly, it will last a while. My biggest issue is the small amount of product for the price.
Trustpilot
1 month ago
2 weeks ago