We remain fully operational. Our teams are working around the clock to ensure your deliveries continue safely.

DOWNLOAD THE APP


Copyright © 2025 Desertcart Holdings Limited
DOWNLOAD THE APP


Buy anything from 5,000+ international stores. One checkout price. No surprise fees. Join 2M+ shoppers on Desertcart.
Desertcart purchases this item on your behalf and handles shipping, customs, and support to Italy.
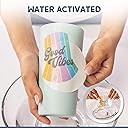
🎨 Transform your ideas into gallery-worthy masterpieces—no design left behind!
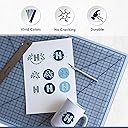
Hayes Waterslide Decal Paper offers 20 premium clear A4 sheets with 200gsm thickness, optimized for inkjet printers delivering up to 5760 dpi print quality. Quick-dry and easy to apply, decals transfer flawlessly after a brief water soak, adhering strongly to diverse surfaces like glass, ceramics, and metal. Ideal for DIY crafters and small businesses seeking professional-grade customization with exceptional value and eco-friendly materials.


| ASIN | B077TMFVL9 |
| Best Sellers Rank | #2,236 in Office Products ( See Top 100 in Office Products ) #1 in Waterslide Decal Paper |
| Brand Name | Hayes Paper Co. |
| Brightness | 95 |
| Color | Inkjet - Clear |
| Customer Reviews | 4.6 4.6 out of 5 stars (21,205) |
| Item Dimensions L x W | 8.25"L x 11.75"W |
| Item Weight | 0.28 Kilograms |
| Manufacturer | HAYES PAPER |
| Material Features | Biodegradable |
| Paper Finish | Coated |
| Paper Size | 8.3 x 11.7" Centimeters |
| Paper Weight | 15 |
| Sheet Count | 20 |
| UPC | 853662007265 |
| Unit Count | 20.0 Count |
M**G
Perfect product
can’t say enough good things about this waterslide decal paper! From the moment I started using it, I knew it was going to be one of my favorite crafting supplies. I’ve tried several brands before, but this one really stands out for its quality, ease of use, and how beautifully it makes my projects turn out. Printing on the paper was incredibly simple — the colors came out sharp and vibrant, exactly how they looked on my screen. I didn’t have to fight with my printer settings or waste sheets figuring it out. The instructions were clear, and the whole process felt smooth from start to finish. What really amazed me was how easily the decal transferred onto my surfaces. After soaking it in water for just a bit, it slid right off the backing paper like butter and applied perfectly. No tearing, no bubbling, and it adhered flawlessly whether I used it on glass, ceramics, or even wood. Once dry, it looked like it was professionally printed right on the surface — so polished and clean! I’ve already used it for customizing mugs, candles, and decorative jars, and every single project has turned out amazing. The versatility is what makes it such a great value — one pack goes a long way, and the results look high-end. If you’re someone who loves DIY, crafting, or even small business projects, I highly recommend this waterslide decal paper. It’s reliable, easy to use, and gives you stunning, professional-looking results every single time. I’ll definitely be buying more — it’s absolutely worth it!
J**N
WET DECAL PAPER REVIEW.
Superior Product. This is my go-to from now own. I use a laser printer with no problems. The decal lays under the clear spray. Spray EXTRA heavy nand let dry completely. A+++
C**E
Easy, Clear Printing: Remember to not touch until you seal it!!
This is my first time with any type of waterslide decal that I can print myself. Such Fun! IMPORTANT if you're like me and skim directions, at best. 1. Don't Touch after printing! They Will Smear! 2. Follow the directions on using Clear Spray Paint to Set the Ink. I've also used clear nail polish when in a bind. It worked great for me. I got even better results with gel top coat polish I set under UV. These were for very tiny pieces, less than 1/4". After I slid them onto the surface and let dry, I added another coat of gel top coat and 20 seconds under UV. I'm going to experiment with larger pieces and resin as a seal and finish as spray painting is not easy in my situation. I'll let you know!
J**Y
It works! Better than average waterslide product.
With all the positive reviews I was excited to try the Hayes Clear Waterslide paper as I’ve made hundreds of waterslide labels over the past 10 years. I’ve mostly used Lazertran Inkjet, but when they ran into production issues I also tried a few others, all junk. I just finished my last two sheets of the Lazertran and printed my first few of Hayes. Right away there are a few differences. First, Hayes has logo printing on the back so you know which side is which. Lazertans has a subtle shade of off-white, in some light it is obvious, in some light you are guessing. Second is the size. LT is 8.5x11, whereas Hayes is an odd 8.3x11.7. If you are using previously created layouts, make sure they still fit. In my case I have bonus space to fit a few more items in. The third is finish; LT is a very even (usually) flat off-white whereas Hayes is a semi-gloss I guess you’d call it. Looking at it off-angle there is an almost soap film streak appearance to it. But once printed and sprayed it is not visible at all. Speaking of spraying, many state emphatically that ALL inkjet papers need to be clear coated, not entirely true. I sold many products for years with perfectly stable inkjet printed labels without clear coating before applying to my product, which is then overcoated. That ended when I had to switch from a printer with 3 individual color cartridges (plus black) to an all-in-one color cart printer. The off-brand papers all needed heavy overcoating to be usable regardless of printer. Although only 51 degrees out (I’ve read or heard that 50 F is the minimum temperature for this task) I decided to try my first application. A small label went on fine, then I soaked my larger label. I noticed that after 20 seconds it started to loosen, so I applied it, holding down one end and tugging on the paper, and had my first learning experience: This stretches! Give it the full time as instructed and still be careful not to stretch it when sliding it off. I’ve rushed this before with other papers because longer soaking sometimes means losing the glue, which is between the backing and the paper. A second one worked fine, although a little longer soak would have been better. Another difference between Hayes and others is that this is a plastic film instead of a thin paper label. It appears that once on properly it is more durable, but takes considerably longer to dry. To get the bulk of the water out I place a piece of paper towel on the label then use a rubber roller to gently squeeze out the water. After a half hour the label looks and feels dry, but I’m waiting to finish it. The real relief is that the label has stayed flat down on the box, no curling up in the corners or along the edges like I’ve been used to recently. I have to weigh in on the ‘debate:’ While I’m sure people can apply a reversed image outer surface of the label to an item and make it work, it is designed with the glue on the inner surface. This not only worked well for my test, but it worked better than most other papers I’ve used. But whatever works for you is right for you! I’m applying this to a powder coated aluminum electronics box, which I lightly roughen with a fine sanding block. With final coats on, I am very happy with this product. There is a bit of a learning curve, it is certainly a skill as it is with any waterslide material, but this is a very nice product at less than half of what I had been paying.
K**N
good product
the decal paper fed nicely and worked as expected
H**Z
Easy Peasy
After ordering some lousy custom decals online. I decided to make my own and it turned out great. Simple to do, just followed the directions on the package. I am very pleased with this product.
F**E
Waterslide Decal Paper
This item is exactly what I needed. Fast shipping too.
S**N
This decal paper is your best choice.
I have tried several brands of decal paper with disappointing results. This one surprised me - it works exactly as it should. Colors hold up well and slides do not disintegrate. Be sure you are using an ACRYLIC spray to bond the artwork. This decal paper is your best choice.
T**S
Just Perfect!
I**N
Detta dekalpapper fungerar precis som det är tänkt, titta på bilden text och varningstrianglar är gjorda med detta dekalpapper. Har även gjort bilder som sitter på kaffemuggar och de sitter fast som f..n. Viktigt att klarlacka det man har skrivit ut innan man överför bilden.
F**Z
Todo bien gracias
J**N
Dekorerade en modell rallybil, dekalarket är lite opakt så detta kräver nog att underlaget är vitt.
C**O
GUIDA ALL'USO PER RISULTATO PERFETTO: - stampare il file immagine che si vuole sulla versione lucida del foglio, le immagini vettoriali avranno una qualità di stampa decisamente superiore. Stampare alla massima qualità indicando il "foglio lucido" nelle impostazioni. - Attendere che l'inchiostro si asciughi bene, io ho atteso 1h circa. - Ho comprato le bombolette acrilico trasparente AMBROSOL (lucido o opaco, dipende dal risultato che si vuol ottenere). Questo marchio ha il beccuccio erogatore con un po di ventaglio perfetto e di facile utilizzo. - Prima mano "veloce" per fissare l'inchiostro. Tenete il pezzo contro luce per poter vedere quanta vernice avete steso e se stesa uniformemente. Attendete 5 minuti e passate la prima mano "grassa", prima nel senso della lunghezza del pezzo e dopo nel senso della larghezza in modo tale da formare un "reticolato", contro luce dovete vedere la vernice lucida omogenea e senza buccia d'arancia. Attendete asciugatura 15 minuti a 20° circa. Per temperature minori, almeno 30min. Controllate che non si sia depositata polvere e procedete con la seconda mano anch'essa grassa ad incrociare. Attendete 12-16h di asciugatura per star tranquilli. SE NON VENGONO EFFETTUATE 3 MANI DI ACRILICO, vi si frantumerá nelle mani quando cercherete di staccarlo! - Ritagliate con forbici la vostra immagine a 3mm dal bordo. - pulite e preparate il supporto dove applicare la vostra decalcomania, non deve esserci polvere o granelli perché faranno spessore dove si accumulerá acqua che non riuscirete a togliere. - immergete in una bacinella per 60 secondi in acqua temperatura ambiente la vostra immagine, tenderà ad arrotolarsi, non abbiate paura è tutto regolare. - uscite dall'acqua la decalcomania e con due dita cercate di "slittare" di qualche millimetro l'immagine ed il supporto bianco di fondo. Appoggiate al supporto la vostra decalcomania dal lato dove la vostra immagine si è staccata e con un dito tenete fermi. TRANQUILLI che il posizionamento/centratura potrà essere effettuata in seguito. Con le unghia iniziate a sfilare il supporto bianco da sotto mentre tenete la vostra decalcomania ferma. - sfilato il supporto bianco, posizionate la decalcomania e con un fazzolettino piegato a metà o in 4 iniziate delicatamente a spingere fuori tutta l'acqua che c'è sotto la decalcomania, è la stessa operazione che effettuate quando pulite i vetri della doccia con lo scopettino. Se non rimuovete l'acqua sotto la decalcomania si asciugherá con delle bollicine visibili e fragili perché non aderenti al supporto. - Tolta l'acqua in eccesso, fate asciugare per 3-4h. Per chi vuole applicare un ulteriore strato protettivo acrilico lucido o opaco, può farlo tranquillamente. Se si vuol passare su tutto il supporto il trasparente acrilico finale, sarebbe meglio applicare un fondo sempre a bomboletta. Fine :)
Trustpilot
1 month ago
1 week ago