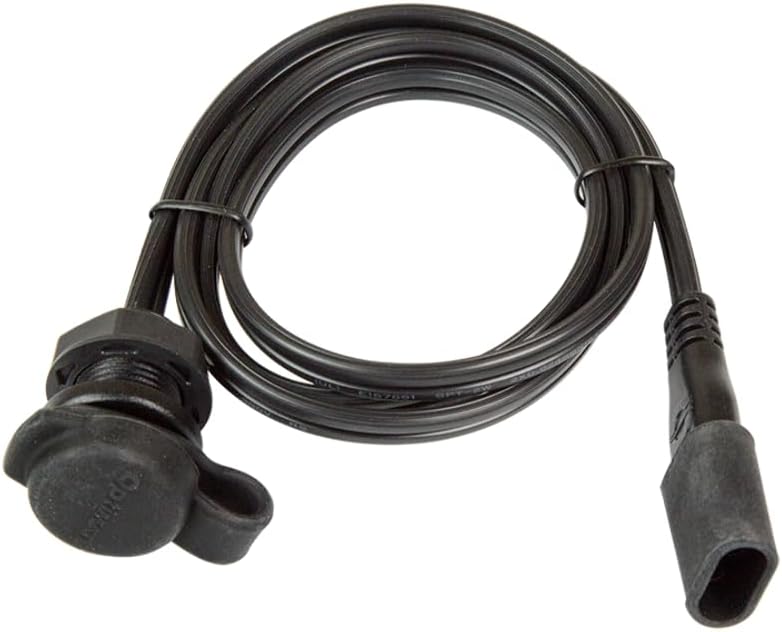

🔌 Stay charged, rain or shine — the ultimate SAE socket for pros on the move!
The OptiMATE Cable O-40 is a weatherproof, panel-mount SAE socket designed for seamless integration with premium motorcycles like BMW, Triumph, and Ducati. Rated for 10 amps and built to withstand extreme temperatures from -40°C to 60°C, it offers a durable, flexible connection for charging devices. Its universal compatibility with SAE connectors and OptiMATE chargers ensures reliable power access in any environment, making it a must-have for the discerning rider who demands convenience and resilience.


| AC Adapter Current | 10 Amps |
| ASIN | B01N57XLNS |
| Best Sellers Rank | #110,088 in Automotive ( See Top 100 in Automotive ) #410 in Automotive Replacement Electrical Accessories #10,144 in Motorcycle & Powersports |
| Brand | OptiMate |
| Cable Length | 0.39 Inches |
| Cable Type | USB |
| Color | Black |
| Compatible Devices | Charging Adapter |
| Connector Gender | Male-to-Male |
| Connector Type | Usb |
| Customer Reviews | 4.6 4.6 out of 5 stars (615) |
| Date First Available | November 28, 2016 |
| Exterior | Machined |
| Global Trade Identification Number | 05425006144339 |
| Indoor/Outdoor Usage | Indoor, Outdoor |
| Is Discontinued By Manufacturer | No |
| Item Weight | 1.76 ounces |
| Item model number | O-40 |
| Manufacturer | TecMate |
| Manufacturer Part Number | O-40 |
| Maximum Voltage | 5 Volts |
| Model Name | OptiMATE CABLE O-40, Weatherproof SAE socket, panel mount - 40" |
| Number of Items | 1 |
| Number of Pins | 2 |
| Outer Material | Rubber |
| Recommended Uses For Product | permanent vehicle mounting for charging devices, outdoor and indoor usage with SAE-compatible devices |
| Shape | Round |
| Special Feature | Weatherproof |
| Special Features | Weatherproof |
| Specification Met | SAE |
| Unit Count | 1.0 Count |
| Wattage | 50 watts |
M**U
Good quality panel mount
Good quality panel mount item. The waterproof cover is a little too easy to open and close, but not an issue so far.
S**2
Great
Works as it should. I replaced the 12v socket I didn’t use on my street glide with this. Works great for winter storage plus there’s a bunch of adapters you can buy that plug into this. Nice solid connection using my Noco battery tender, install was easy. For the price was well worth it.
C**O
Perfect for hard to install locations
This is the solution where you don't have a deep area to work with. I purchased the other outlet designed for bags (http://smile.amazon.com/Powerlet-Luggage-Electrix-Connector/dp/B00206ENZ0) and it requires getting behind the mounting surface to install. This makes it harder to install in some locations. It also is much larger a diameter. This one requires only access to one side (after you fish the wire through) although it does have a taller socket on the surface. While the other socket worked out great on my tractor, adding it to my motorcycle was going to be a much more complicated installation requiring the removal of a bunch of things to get to the place I wanted to mount it. My application was to have a socket on my motorcycle that I could easily hook up my BatteryMinder, or plug in my Cycle Pump compressor without having to pop off pieces to access the battery or fish out the SAE end of a cable. In my case, I can easily run a wire, but the ideal spot for placing the socket was both difficult to access the back and would require a lot of work to remove the panel to install off the bike. I also was finding that the larger diameter of the other socket would be a real challenge to fit on the recessed body panel where I wanted it. With this socket, I simply had to be careful drilling the 1" hole (so that I did not go too deep and nick something under the panel) That was easy enough. Then, I attached a longer wire to the cable to fish it to a more accessible location. The attached 8.25" cord isn't long (not including the connector) but it was long enough to get to a place I could attach the SAE connector that I had already put on my battery. Had it not been long enough I could have removed the terminals from my battery and fished the whole assembly up through the 1" hole easily enough. The point is that you don't need to really get behind the panel you are mounting to as long as you can fish the wires. Once the wire is run, you only need about 1/2" of space behind the panel for the socket's rubber plug to set into to make the socket flush to the panel. Once you have it flush, start tightening the nut and it expands the rubber plug behind the panel to hold the socket in place. On the fairly thin plastic panel I was mounting this to, it tightened and reinforced the panel well enough that pushing an SAE cable into the socket and removing it again is no problem at all. The rubber weather cap fits tight over the socket to keep the connector clean and dry. All in all, this was a VERY easy install taking all of about 10 minutes. Removing the panel to install the other socket would have been more than an hour operation. I'm not sure how thick a panel you could attach it to, but I'll bet it would work up to a 1/4". Easily on anything thinner. For the roughly 1/8" thick plastic I was mounting to, it was no problem at all. Not only does this make hooking up the BatteryMinder so simple I can have the bike on it while on vacation or even a stretch of rain to be sure the battery is in top shape when I get on the road again, but I no longer have to carry the battery clamps for the Cycle Pump which saves precious space on the bike. With AGM batteries so freaking expensive, keeping them in top shape is well worth the trouble. The only downside? It's a lump of plastic. Unless you have a nice out of the way place to install this, it will be quite noticeable. On my panel, with the weather cap in place, it stands 1.25" high off the panel's surface. In my case, I tucked it into a little hollow so that does not really matter, but if you had to mount it on the side of something, it would look like a wart. Oh, and it did not take 1-2 months for this to arrive. I ordered it on June 3rd and it arrived on the 13th.
D**E
Perfect Addition to My Travel Trailer
I have been in the process of upgrading my electrical setup on my travel trailer, which meant a new battery box. One of the additions I made was an integrated cutoff switch in the box. That came out so well I decided to also integrate a charging port so I would never have to open up the box for routine maintenance. This connector filled the bill perfectly. I drilled a hole in the end of the box and slipped it right in. The packaging says to drill a 23/32" hole but don't worry, an 11/16" hole with a Unibit fit perfectly. I didn't need the plug end on the wire so I cut it off and crimped 5/16" ring terminals on the wires to go to my threaded battery posts. Be sure and install the rubber grommet on the outside of the box if this is exposed to weather like mine. Now I can plug in my Battery Tender whenever I need to, with no hassle. I think I'm going to use the plug I cut off and wire it to some alligator-clip test leads, then I'll also have an easy way to check battery voltage if necessary.
J**S
Very good quality - make sure you understand how it mounts
This product is almost perfect... The quality of all the parts is top notch and everything is very well built. My main problem is the design of their mounting system. Basically you drill a 1 inch hole wherever you want to mount this, and then insert the whole thing, starting with the cable into the hole from the front and once seated, you screw down the outer ring. Screwing down this ring compresses a rubber sleeve over the part you inserted into the hole, causing it to expand and "lock" the whole thing in place. Overall, a very clever system where you don't have to feed anything through the whole from behind and can do all the work on the front side of the hole. The problem comes in when you are installing this in a piece of thin material like a steel plate. Without any real thickness of material to grab onto you can't really get things tight enough to stay in place and not move. If you were drilling into something that was maybe 1/4 inch or more, I think you would be fine, but 1/8 or 1/16 plate doesn't really work very well. I ended up feeding the socket through the rear of the hole in my case, discarding part of the cover, and then using the lock ring in a more traditional way to clamp things through the hole. This works pretty well, but since the lock ring is meant to compress the rubber sleeve, it still does that and you can't really tighten it up quite as much as I would like. Ideally I'd love to see them come out with a model that was meant to clamp on the surface it is mounted to from the front and back in addition to this model. I can see where this model would be perfect in many situations, but not quite for me.
M**K
Work GREAT!
I have a Can Am X3 and getting to the batter is a pain as it is behind the passenger seat. The seats are bolted down so it is time consuming to get to the battery. I like putting cords on my toys to maintain the battery when not in use. The standard cord that comes with the trickle charger barely reaches to the edge of the seat when in place. I found this item and mounted the plug in the center console. Works awesome, no more trying to find the cord or taking the seat out. Plus it has a dust cover that makes resistant to water and mud. I have not had them long so cannot testify to the longevity but first impression is great. Definitely worth the money if you have a hard time getting access to your battery and like to put on a trickle charger. There are other reviews about the stock cords not fitting in this socket but I had zero problems with mine working.
J**C
I wanted a suitable connector to provide a removable solar connection to a project I was building and this was just the job. Provides a nice reliable and waterproof connection. Hasn't given me any problems so far. I would imagine it would work well providing a nice quick access charger connection point on bikes, boats etc.
N**A
Ho usato il prodotto per collegare un ecoscandaglio Lawrence alla scatola impermeabile.
A**ー
乗ってるバイクが、カバーを六角で外すとそこにSAEコネクタがぶら下がってるタイプなので、カバーに穴開けてこれを付けて工具レスで充電出来るようにしました。 ネジ側じゃない方をぶった切って延長してフューズかましてバッテリーに直で付けてます。 延長もSAEで出来ますが、太くなるし、延長コードもまずジャストサイズは無いでしょうから、ねじ込み側のコネクタのみの商品があってもいいように思います。 ネジはプラ製ですが結構しっかり閉められますし、ゴム製キャップも脱着容易でちぎれそうな感じもしません。 他に、テックメイトのハーネスには許容電流違いがあるので、そこがめんどくさいです。
C**N
Installation au top
A**I
Ottimo Prodotto, ben fatto e da facile installazione
Trustpilot
2 months ago
2 weeks ago