

Desertcart purchases this item on your behalf and handles shipping, customs, and support to Italy.
🥞 Elevate your brunch game with cast iron precision and endless flavor combos!
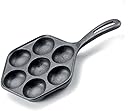
The Norpro Cast Iron Stuffed Pancake Pan features 7 spherical 2-inch wells designed for making traditional Danish aebleskiver and stuffed pancakes. Crafted from heavy-duty cast iron, it offers superior heat retention and even cooking. Versatile for sweet or savory fillings, it comes with detailed recipes and care instructions, making it a must-have for home chefs seeking authentic, Instagram-worthy treats.


| ASIN | B000F741O4 |
| Best Sellers Rank | #203,987 in Kitchen & Dining ( See Top 100 in Kitchen & Dining ) #1,176 in Skillets |
| Brand | Norpro |
| Brand Name | Norpro |
| Capacity | 6.5 inches |
| Color | Black |
| Customer Reviews | 3.9 out of 5 stars 1,709 Reviews |
| Global Trade Identification Number | 00028901031145 |
| Included Components | Norpro Cast Iron Stuffed Pancake Pan, Munk/Aebleskiver |
| Item Diameter | 2 inches |
| Item Dimensions D x W x H | 0.75"D x 11.5"W x 0.3"H |
| Item Type Name | Norpro Cast Iron Stuffed Pancake Pan, Munk/Aebleskiver |
| Item Weight | 703 g |
| Manufacturer | Norpro |
| Manufacturer Part Number | 3114 |
| Material | Cast Iron |
| Material Type | Cast Iron |
| Model Number | 3114 |
| Number of Items | 1 |
| Number of Packs | 1 |
| Occasion | Birthday, Christmas, Valentine's Day, Wedding |
| Product Care Instructions | Hand Wash |
| Product Dimensions | 0.75"D x 11.5"W x 0.3"H |
| Shape | Round |
| Size | 2" / 5cm diameter |
| Special Feature | cast iron |
| Specific Uses For Product | Pancake |
| UPC | 028901031145 |
| Unit Count | 1 Count |
| Upper Temperature Rating | 350 °F |
| number_of_cups | 7 |
D**D
Works great - but some prep before using is required.
I bought this as an alternative to the "Pancake" version that is selling on infomercials. The price on Amazon was way less than what was offered on TV so I pulled the trigger. The pan arrived at my house and as much as my kids wanted to fire it up right away, my Grandma always taught me that you must season a new cast iron pan first before using. There are about 1000 different methods out on the web to seasoning your pan. I chose to season my pan in Crisco and instead of using the oven on cleaning mode and putting up with the smoke in the house, I took it outside and put it on my charcoal grill where I had a nice HOT fire waiting for it and a piece of aluminum foil underneath the pan to catch the excess. I left it overnight and took it out the next day and saw that it was a very dark Carmel color - and now ready to its first use. There is a bit of a learning curve to getting the temp right for the pan and also flipping over the pancakes, muffins, eggs, etc. Also, be sure to use a non-stick cooking spray before using the pan and after each pan of whatever you are cooking. You will also definitely need a couple of utensils to flip over each item in the cooking well - it's not as easy as they make it look on TV with using a single bamboo skewer, but with some practice it's not difficult at all. We cooked several pans of pancakes and then my wife used it for eggs. Use the smaller eggs since the cooking wells are not very large - the small eggs are just the perfect size for it. We have also used it for blueberry muffins and the desert recipe that came with the pan. It does take a bit longer to cook the same amount of pancakes but the kids love it and who am I kidding, so do I. Highly Recommend.
B**E
Great Lil Pan for Lil Food Pockets of Fun!!!
Bite sized pancakes, biscuits, and all that jazz. Even stovetop brownies are a breeze in this thing. Then I took it to the next level and started stuffing these things with all kinds of goodies. Like bacon, jelly, bacon, cream cheese, bacon, chocolate chips, and oh yeah… and bacon!!! I’m sure there are other things you could stuff in there, but I’ll stick with bacon. So this thing comes to us unseasoned and in and unusual metallic silver finish. Lovely right? Okay so like all new cast iron items go ahead and blast it in the oven. I suggest not going over 500 degrees. If you can dedicate a good 12 hours to this thing then by all means do so. If you buy it in the winter go ahead and do this process during the day if you’re at home. It will keep your kitchen and other surround areas warm. Just like in the olden days. And you can cut off the heat to save a few cents for the day. You can do the 12 hour round or you can break it down into 3 four hour sets. Let this thing cool overnight after each round. It’s gonna change color. It won’t turn black, not just yet like your great grand mama’s, but it will eventually. It will be a deep amber/brownish color. Now rub the whole thing in a cooking oil of your choice. Meaning the top, bottom, and handle. Oil needs to be on every exposed surface. Make sure it’s something with a high smoking point. I suggest safflower oil which is usually sold at most supermarkets and not too expensive. Toss it back in the over for a few hours. 3 or 4 should do it. Let it cool and take it back out. Now the destructive part… Get a brillo pad or a steel scouring pad and scratch the tackiness from inside the cooking area. You could scratch the entire pan, but only the cooking surface is necessary. Over time the tackiness, if there is any left at this point, will only quicken the darkening process of the pan. Oil the scratched surface and put it back in the over for another 4 hours and cool it down. Do this two more times and the pan will be safe to use. You won’t have that metal taste or black flacks ending up in your food. When cooking with this apparatus, make sure your pancake or biscuit is cooked on the edges before rolling/flipping it over. Using a chopstick or a fork will do the trick. With brownies let them cook a little longer unless you like fudgy insides. Also if you’re trying to stuff your items with bacon or a filling of your choice, do so before flipping. You can push hard fillings down into the batter and flip. When adding jellies and creams, add a small dollop of batter on top of the filling and then flip. After you burn a few or let a few come out doughy, you will learn the range of the pan and what temperatures work best with which kind of food. There are only 7 spaces, but for the most part things cook up really fast. You’ll have a whole mound of goodies sooner than you think. Have at it people!
S**U
Gives off weird chemical plastic smell. YUCK !!!
It took a while to arrive. I was excited when I received it but it didn't last long. First it did not look like any other cast iron that I own. Even though it does weigh as heavy as cast iron, it looks too gray than any cast iron. So I washed and applied oil generously and started cooking in it. After a few minutes of heating it just started with weird fumes with a weird burnt plastic smell. Still I tried to make the first batch because I thought it was the oil coating I had applied. But it just kept fuming and giving off that plastic chemical smell and I didn't want to use it anymore. I washed it thoroughly and seasoned it again and still gives off that yucky plastic smell and it definitely is not like the usual cast iron. It's still the same gray as when it arrived and I own so many cast iron pots n pans which I have seasoned on my own and this is nothing like it. I doubt if it's cast iron or if some other non stick coating was applied during manufacturing itself because my first batch I cooked just fell out of the pan, literally. No sticking nothing. I have never had a cast iron that did that on the first use and even after several washes there's no rust and it still smells the same when I heat it. I need to return it and either get a new one. Hopefully that'll work better.
A**N
A fine but small pan if you season it.
Before ordering I read a lot of the one star reviews on this item. I ordered the item anyway, because I had a hunch about what was going on. When it arrived I did find one downside. I was buying this for the recipe in the products name, but also for making takoyaki (a Japanese dish). The depressions in this pan are a little big and not circular enough to make picture perfect takoyaki. That said, most of the one star reviews involve either food sticking or the product rusting after the first cleaning. I am convinced this is because the people giving the reviews do not know how to season and care for cast iron. As the instructions on the packaging state, you must season this pan when it arrives. There are numerous sources on the internet that tell you how to do this. It amounts to heating the pan up until lard liquefies and smokes when you put some in it. Then you rub the whole thing down with oil, watching as it turns a dark color before your eyes. Then, to clean, you don't wash it like a normal pan. If you leave it wet, even seasoned, it will rust. Look up on the internet how to care for it. This is not a 1 star pan. Its small in overall size. The depressions are pretty big. Its priced to its size. The pores in the cast iron are not very big. It seasons nicely. I've included a picture after my initial seasoning.
W**Y
Truly Nonstick
My kids love the Belgian Boys bite sized pancakes, and they’re great and all but they do get expensive. I figured I had nothing to lose buying this mini cast iron skillet to make mini pancakes and it did not disappoint. I don’t have fancy sticks to flip them so two forks did the trick to flip them over. I let the skillet get hot on median-high heat and then sprayed it with avocado oil before throwing exactly one tablespoon of homemade pancake batter. They cooked evenly, but you definitely want to keep an eye on them and not let the cast iron overheat if you don’t want your pancakes burned. I’m super happy with unnecessary purchase and I recommend it to anyone who enjoys bite size pancakes. The pan itself is super small, literally the size of my hand I was expecting it to be bigger for some reason but regardless of size, it works as advertised.
D**A
The mold depressions aren't round at the bottom; they're flat
This ebelskiever or takoyaki pan has 7 depressions to pour your batter into. It's a decent, not too heavy, cast iron pan, with no coating, which is exactly what I was looking for. But for the dish I was looking to make, which is an Indian dish called nei appam, the indentations need to be round; but the pan is flat bottomed. Eh, you think, what difference does the shape make? I kind of agree in principle, but in practice, it makes a huge difference, because it looks as if the dough doesn't/hasn't rise/risen, and each piece has fallen, like a fallen meringue. Then, because it is not super heavy, the batter sticks no matter how much you grease the pan, or cook with extra oil (ugh). And then you have to soak the darn thing to get it clean. While the item itself is OK, I find I am unable to use it. :(
C**R
Excellent pan for small batch cooking
I bought this Aebleskiver pan to make takoyaki. For this purpose a thing to note is that the Aebleskiver is an oblong pancake and the takoyaki is a spherical pastry. So, as the proper form for takoyaki is to give them a quarter turn as they cook so they come out evenly cooked, the shape of the Aebleskiver pan's cups makes this impossible. It's not a big deal as they end up cooked and tasting the same but something to note that I didn't see written anywhere else. The size of the pan is very small. A single recipe of takoyaki makes about a cup of batter which in this small pan means about 3 cooking batches for about 23-24 balls. Also, I have a gas range so the burner's grill has only a few contact points. This is fine for the rest of my pots and pans with flat bottoms but the Aebleskiver pan's uneven bottom means the pan will move a lot as you cook, which means you'll have to hold the handle in place as you cook with a towel or oven mitt. It's a solid cast iron pan so I expect it to be on hand for a good lifetime or two. The only thing to note is its inconvenience only because of its size.
V**C
Really nice!
Made perfect aebelskivers the first time I tried. Put chocolate chips in them.. yum! Also used this to make takoyaki and they were perfect too! Highly recommend! :) EDIT: I found out how to maintain and care for cast-iron cookware and PREVENT RUST. How To Season A Cast Iron Skillet What You Need Materials Cast iron skillet Dish soap Sponge or stiff brush Clean, dry cloth or paper towels Vegetable oil or shortening (or other oil of your choice) Equipment Oven Instructions 1. Preheat oven to 325°F. 2. Wash the skillet with warm, soapy water and a sponge or stiff brush. Cast iron should not normally be washed with soap, but it's fine here since the pan is about to be seasoned. 3. Rinse and thoroughly dry the skillet. 4. Using a cloth or paper towel, apply a thin coat of vegetable oil or melted shortening to the inside and outside of the skillet. Vegetable oil and shortening are the most commonly recommended oils used for seasoning, but according to Lodge, you can use any oil of your choice. 5. Place the skillet upside down on the oven's center rack. 6. Place a sheet of aluminum foil below the rack to catch any drips. 7. Bake for an hour. 8. Turn off heat and allow to the skillet to cool completely before removing from oven. Additional Notes: A seasoned skillet is smooth, shiny, and non-stick. You'll know it's time to re-season if food sticks to the surface or if the skillet appears dull or rusted.
Trustpilot
1 week ago
2 months ago