
Compatible with Mazda Miata Convertible Top with Plastic Window & Attached (Pre-Installed) Rain Rail, 1990-2005 - (Tan)
Product ID: 146945440
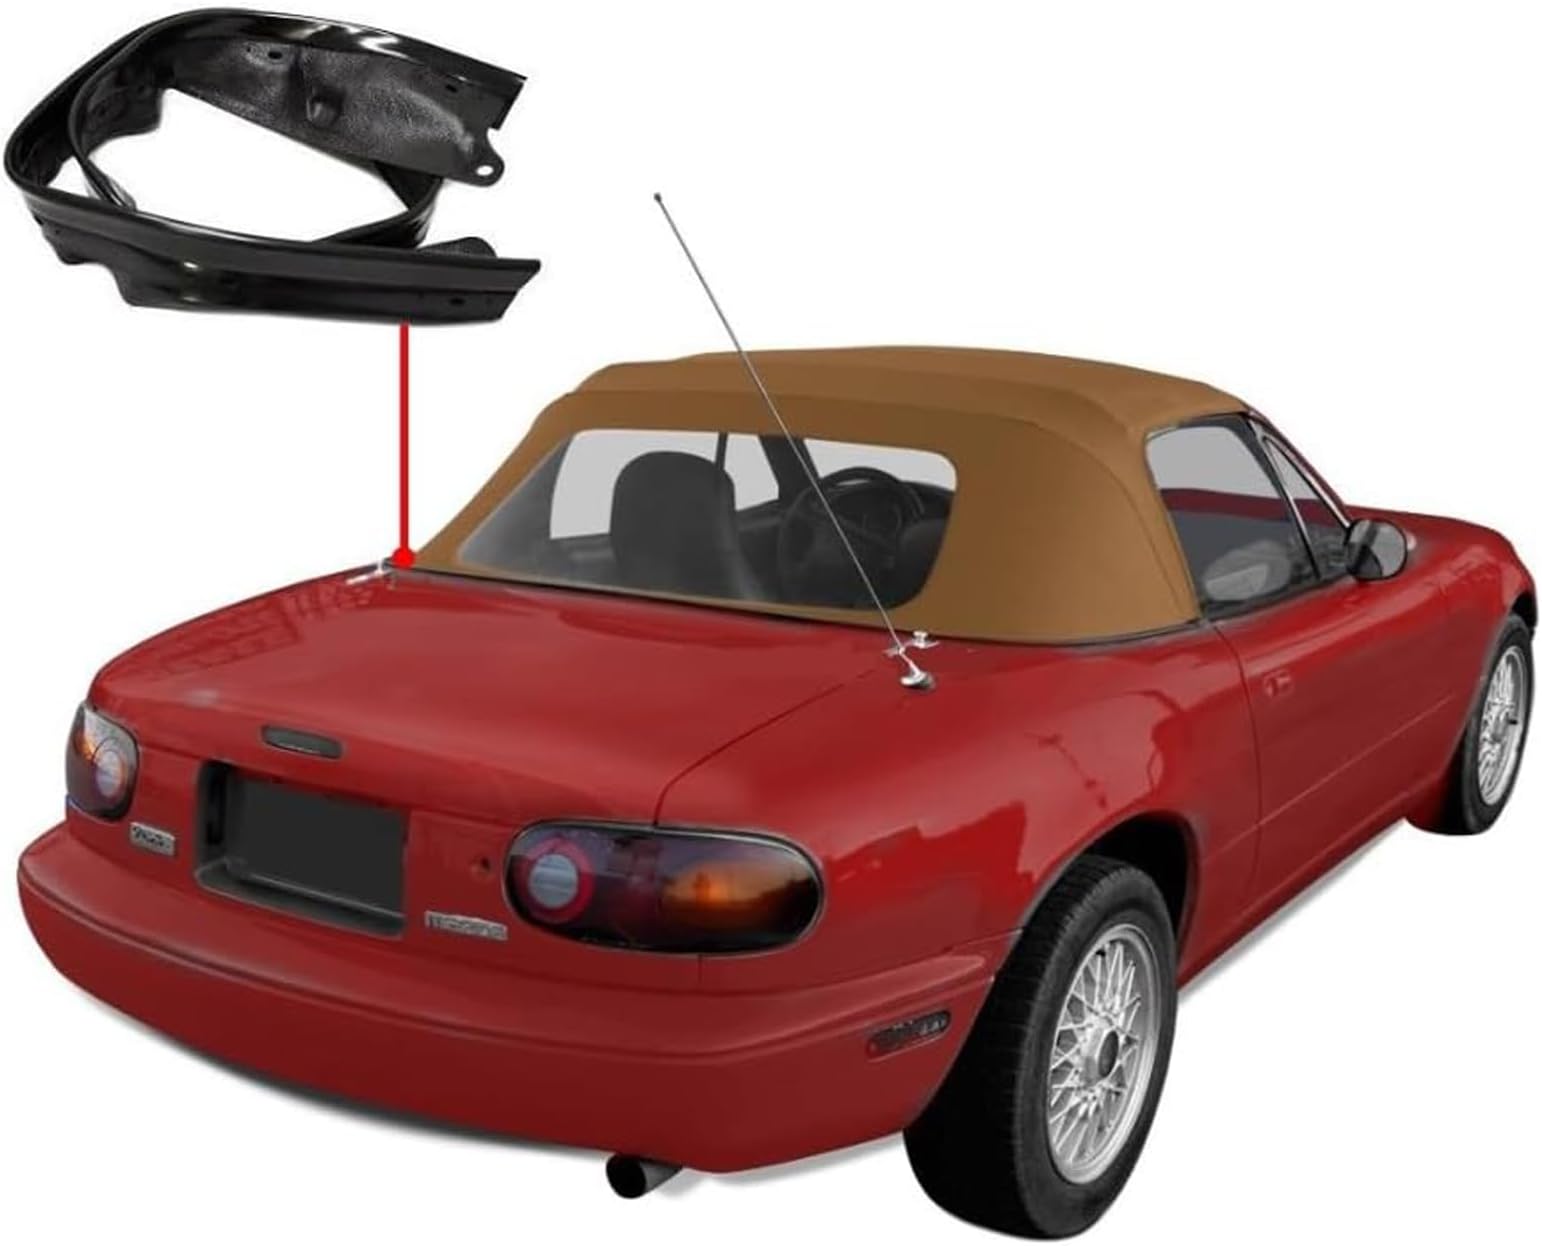
🔍DOT rated window
🧵Premium polyester stitching
🌧️Flexible rain rail
Buy anything from 5,000+ international stores. One checkout price. No surprise fees. Join 2M+ shoppers on Desertcart.
Desertcart purchases this item on your behalf and handles shipping, customs, and support to Italy.
🚗 Elevate Your Ride with Style and Durability!
This Compatible Mazda Miata Convertible Top features a premium tan Cabrio Grain Vinyl construction, a heat-sealed DOT rated plastic window, and a factory-installed flexible rain rail, ensuring both style and functionality for your 1990-2005 Miata.
| ASIN | B07FPV32VB |
| Auto Part Position | Outside |
| Automotive Fit Type | Vehicle Specific Fit |
| Best Sellers Rank | #114,716 in Automotive ( See Top 100 in Automotive ) #54 in Automotive Tops & Roofs |
| Brand | AutoBerry |
| Brand Name | AutoBerry |
| Color | Tan |
| Compatible with Vehicle Type | Car |
| Customer Reviews | 4.1 out of 5 stars 101 Reviews |
| Exterior Finish | Textured |
| Fit Type | Vehicle Specific Fit |
| Installation Type | Outside Mount |
| Manufacturer | AB-017-MM-CT |
| Manufacturer Part Number | AB-017-MM-CT |
| Material | Glass |
| Material Type | Glass |
| Number of Pieces | 1, 2 |
| Style | Classic |
| Style Name | Classic |
| UPC | 726060980167 |
T**R
A nice top, but boy does it makes you work for it.
Let me preface this by saying that I usually love working on my cars. It's my hobby and stress reliever. However, the soft-top installation definitely did not leave me stress-free. Logistically, the top arrived timely, boxed well with minimal folding. There were still 2 notable folds, and we'll get to those later. Removal of the frame from the car is fairly strait forward. Make sure to get all the bolts off the rain rail, and the 2 press in clips that also hold on the metal 'tops' on the edges of the door frames. Once the soft-top frame is off the car, and the old top removed from the frame, installing the new one is essentially reverse from removal. There are plenty of tutorials on how to do this, but they all seem to do it differently. Read up, and figure it out as you go along. Some notes are that rivets can be avoided if you want by not installing the 'ghost' rivets under the metal weatherstrip frame, just make sure the weatherstrip frame very secure; you can use a pair of zip ties in lieu of rivets on the small flap. This area holds no tension and is not visible, so I went with 2 black zip ties back to back instead. After the top is back on the frame, hoist it back on the car, secure the 3 frame bolts, and take a break. Gather your patience and strength. Not kidding, this part took a few hours of grunting, working one nut at a time, and mainly just not having a good time. Several choice words were said during the course of this step. Installing the rain rail to the car was the most difficult part by far. The rain rail is stiff as a board, is hard to work with, and is a victim of the 2 aforementioned folds. These folds became creases in the rain rail that made it really difficult to stretch out enough to go over the bolts. You can't just slap it on the car and bolt it on, oh no. I started from the edges and worked to the middle. First without the metal frame, then once the top was affixed all the way around, i installed the metal frame pieces one by one. **A heat gun made it possible.** Using the heat gun on the rain rail and massaging it into place while wearing some mechanics gloves did the trick. One section at a time. After it was all on the bolts I hit it with the heat gun one more time, let it sit 30 minutes to re-stiffen, and then installed the metal frame over it. It still needed some heat gun treatment during the final bit. Just be careful not to heat anything but the rain rail. After that, the next hurdle was latching it. I left it taught with a few shop manuals on it overnight to help stretch it. The next day I loosened the top latches as far as they would go, and just couldn't get it close enough to latch. Finally after some massaging (i.e. 10 minutes) by pushing from the back of the car onto the rear 2 frame pieces, and by having someone sitting in the car pulling it forward, we finally got it latched. I'm going to let it sit in the sun a day or two before tightening the top latches further. All in all it is a difficult job that can be done with some minimal tools, an abundance of patience and free time. Feel free to get rivets if you so choose. It doesn't seem to be an issue without them. Do not forget the heat gun, or at the very least, let it sit in the sun on a hot day right before installation. All said it is done, it is a great looking top. I'll update the review later on if there's anything noteworthy that comes up.
R**N
Maybe spend more for a better top unless you absolutely can’t.
I really hoped this would be a cheap bang for the buck, but it’s just a cheap top. I purchased with the rain rail installed. For context, I’ve installed a soft top on a NA frame once before using a Robbin’s top. It was not easy, but doable and I completed the job in 5 hours including removal of the frame and reinstallation. I first off, the top tore installing it onto the frame. It is just slightly too small in every dimension. I’m now dealing with this when installing it into the car as all of the studs for the rain rain are 2-3mm short of the holes they have pre-cut for attaching to the car. The whole product is just off enough to make this fit badly, and be nearly impossible to reinstall into the car. Finish of the top is fine and it looks nice. I wouldn’t buy it again, get what you pay for I guess.
K**R
Not quite satisfied
The top looks nice, price is good, and appears to fit fairly well. However it was too tight and never loosened. The top never closed properly to seat well with the windows. Air and water could come in. Then, one of the interior seams came undone. I recommend spending $100-200 more for a better fit and peace of mind...preferably one that guarantees to fit.
C**.
New top install
So this was my first time to install a top on my car. My old one was 11 years old and the reason real was cracked everywhere as was the material on the top. I had replaced the back window once. So I decided to get this one because it was a one piece. It didn't come with instructions, but it didn't matter I don't need those. I let this thing sit in the sun for about 6 hours before I started to take the old top apart. I left everything in the car and installed the top on the car. Took about 2 hours to get the old one of and this one installed in it's place. Very painless since the top was already hot. Great product, great material, the top looks better then I expected.
M**R
Good value. Fit is not great.
I'm happy with the value received, yet the manufacturer could have greatly improved it with little cost. The most notable issues were: 1. The material that goes under the B-post (B-pillar) was way too short (and has been for several tops - mine and several my friend bought). This is the tab with 3 holes in it. The two outer holes are for plastic plugs and the center hole is for a screw that holds a metal clip in place. There was NO way to get that to fit... I had to rig it... putting a screw through where there was no hole. Fortunately, in daily use, this seems to make no difference. 2. The material around the edge of the window toward the back of the car, rubs as the door opens. This has also been true with the two installed tops I've examined. 3. The rear window has a visible line where the plastic seems to have a long bead where part is thicker or thinner than the rest and it slightly distorts the vision in my rear view. It's not too bad, but is a minor irritation. 4. The rear window often has a purple haze to it. I don't mind this part much, but it could irritate some. The first two seem to be just them trying to save on a tiny bit of material, but do cause frustrations for installing. On the plus side, it's a great value so I'm glad it's an option. If I didn't care about saving the bucks, I'd try a higher end top. But that's not today. The top works very well and looks great. So far, no leaks.
L**Y
Install was not that bad; nice look
My 16 year old son wants my manual Miata (2000 Evolution Orange manual) when he starts driving in August. After 20 years, my soft top was in tatters. I bought this top and he and I installed it in about 5 hours. We'd read so many install horror stories about how hard it was to put on we were worried. But is was not that bad. There were a lot of tight fits and you have to use a little ingenuity (especially with the rivets), but we got the old one off and the new one on with no major problems. The biggest challenge was getting the top closed because the new one is so tight. It was then that we also realized that the latches had deteriorated and needed to be fixed. But after all, it is finished and looks 100% better that before. Plus the rear window is much larger than the factory glass one. It has not rained yet, so I don't know about how waterproof it is, but it is relatively quiet when the car is moving. Good top for he low price.
A**R
Poor
The rain rail holes were not properly cut, which took considerable time to fix! The fitment around both door windows is poor! There are two lines across the top where the bow retainer is attached to the inside of the top. It looks terrible! This should be A $90 top! For all the time and effort invested in installing this top, it wasn’t worth the price!
A**R
Assembly is difficult, results are okay
Taking off the old top was hard but installing the new one was easier. It was quite tedious and took longer than anticipated. After installation, there was some leaking after it rained and there is a spot close to the windows where air is getting in- this can be rather loud when driving at higher speeds. Rain leaks are no fun, especially in Florida where it rains a ton. The material had to be stretched a bit and attachment latches had to be adjusted, but it fit nice and snug. The aesthetic is wonderful. It looks new and the vinyl gives my miata a clean and clear look. I am still happy with the product, I just wish it didn't leak every time it rains.
Trustpilot
2 days ago
3 weeks ago